
To add columns in PowerPoint, select your text box, go to the Home tab, and click the Columns button in the Paragraph section. You can choose up to three columns or use the “More Columns” option to customize spacing and layout based on your needs.
One of the most effective ways to improve your slides is by arranging text into columns. Columns help break down content, improve readability, and make better use of space, turning plain slides into more visually appealing layouts.
In this guide, you’ll learn different ways to add columns in PowerPoint so you can create cleaner, more professional presentations with ease.
How to Add Columns in PowerPoint?
Columns can be added to PowerPoint in several ways. This article is here to explore two popular methods to help you organize text effectively.
Method 1: Add Columns to a Text Box in PowerPoint
This method allows you to place columns straight into a text box, giving you more control over your text layout. Take these steps:
Step 1: Open PowerPoint and Select Your Slide
Start by opening PowerPoint and navigating to the slide where you wish to add columns. If you are beginning from scratch, add a new slide.

Step 2: Insert or Select a Text Box
To add columns to the text box in PowerPoint, click on the text box to which you want to add columns. If you need to add a new text box, go to the Insert tab and choose the text box. Draw a text box on your slide.

Step 3: Select the Text Box
Ensure that you select the text box by clicking on its border. This is crucial as it activates the formatting options for the text.
Step 4: Open the Home Tab
Go to the Home tab on the PowerPoint ribbon, which is located at the top of the window.
Step 5: Click the Columns Button
Locate the Columns button within the Paragraph group. Click on it to see your options.
Step 6: Select the Number of Columns
You can choose from one, two, or three columns. If you need more control, select More Columns to change the amount of columns and custom widths.

Create professional presentations faster with an AI PowerPoint maker that turns your ideas into polished slides in just minutes.
Method 2: Use a Multi-column Layout in PowerPoint
If you prefer a more easy approach, using a pre-designed multi-column layout can save you time. Here is how.
Step 1: Open PowerPoint and Choose a Slide
As previously said, open your PowerPoint presentation and select the necessary slide.
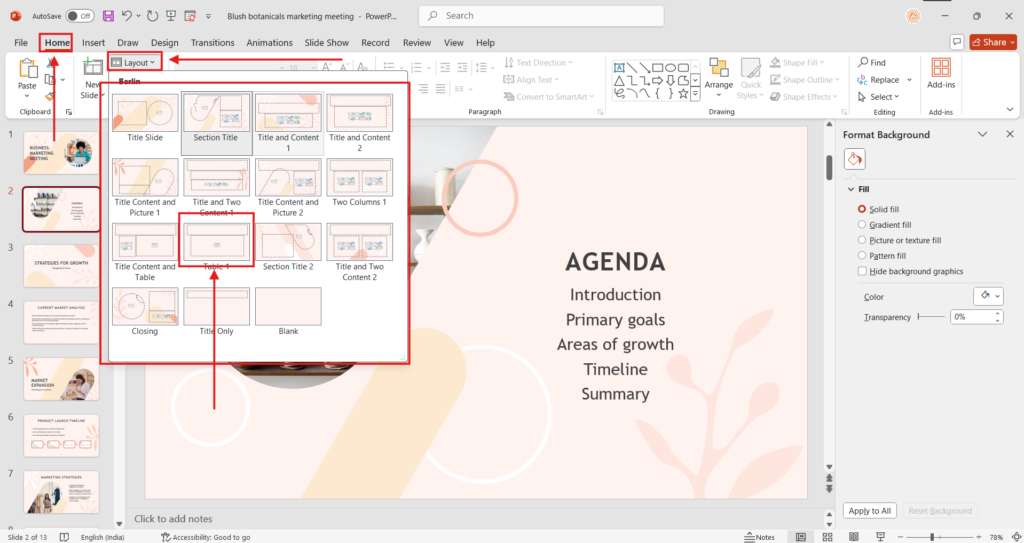
Step 2: Go to the Layout Tab
Navigate to the Layout tab, where you can select several slide layouts.
Step 3: Select a Layout With Many Columns
Choose a layout in PowerPoint that already has several columns, like “Two Content” or “Comparison.” This can save you time on formatting.
Step 4: Adjust Column Widths as Needed
After picking a layout, you can change the width of each column as desired. Click and drag the borders to achieve the desired effect.
Step 5: Add Content to Each Column
Enter the content you want to include in each column. Make sure the text is clear and simple.
Step 6: Format the Text and Elements
Format your text, graphics, and other items within the columns to provide a uniform look. Ensure that the text size is readable and that the colors contrast nicely.
Step 7: Save your Slides
Finally, save your presentation to avoid losing any work.
Method 3: Create Columns Using Tables
Tables are an alternative way to create column-like layouts when you want more control over structure.
Step 1: Insert a Table
- Go to the Insert tab in the PowerPoint menu.
- Click Table.
- Select the number of columns you want (for example, 2 or 3).
- No need to choose multiple rows unless the content is lengthy.
Step 2: Adjust the Table Placement
- The table will appear in the center of the slide.
- Click and drag the edges to adjust its width.
- Align the table to the center for a clean layout (use Home → Arrange → Align → Align Center/Align Middle).
Step 3: Add Text to Each Column
- Click inside each cell to type your content.
- Use bullet points, numbering, or short paragraphs depending on the content style.
- Copy and paste content from other slides if needed.
Step 4: Customize Column Appearance
Tables give you more control over formatting compared to text columns.
Options you can adjust:
- Column width (drag column borders left or right)
- Row spacing (add rows or stretch them vertically)
- Font formatting (change size, style, or color)
- Cell padding (Format Shape → Text Box → Internal Margins)
Step 5: Remove Borders (Optional)
To give the appearance of clean column blocks without table lines:
- Select the table.
- Go to Table Design tab.
- Click Borders.
- Select No Border.
This makes the columns blend seamlessly into the slide layout while retaining structure.
Step 6: Add Design Enhancements (Optional)
You can style the columns to create professional layouts:
- Add background fill colors to cells for contrast
- Add icons or small graphics above headings
- Use shapes behind the table for modern layouts
- Apply different text styles for headers and content
Design Tips for Using Columns Effectively
- Use a Maximum of 2–3 Columns – Avoid using too many columns, as text becomes hard to read. Two or three columns offer the best balance between structure and readability.
- Keep Column Widths Balanced – Ensure each column is evenly spaced unless intentionally designed otherwise. Balanced widths help maintain a clean and visually appealing layout.
- Add Enough Spacing Between Columns – Proper spacing prevents text from looking crowded or merged. Increase column spacing if your content includes bullet points or long sentences.
- Avoid Long Paragraphs – Columns work best with short sentences, bullet points, lists, or key points. Large blocks of text defeat the purpose of using columns.
- Use Consistent Formatting – Maintain uniform font size, color, alignment, and bullet style across all columns to strengthen visual consistency and professionalism.
- Combine Columns with Icons or Graphics – Add small icons, shapes, or symbols above headings to improve visual hierarchy and help readers scan content quickly.
- Use Contrast to Highlight Sections – Apply background color fills or subtle shapes behind columns to separate content segments and enhance readability.
- Ensure Proper Alignment Across Slides – Use PowerPoint’s Align tools to center or distribute columns evenly. Misalignment can make slides look messy and unprofessional.
- Test Readability from a Distance – Columns should be easy to read even when projected. If text looks too small or cluttered, reduce content or switch to fewer columns.
- Use Slide Master for Consistency – If you plan to use columns throughout a presentation, create or modify a layout in Slide Master to maintain consistent styling across slides.
Conclusion
Creating text columns in PowerPoint is an effective approach that can dramatically improve your presentations. You can increase readability, visual attractiveness, and the organization of your material by using the methods indicated above. Implementing excellent column layouts can not only benefit your audience but also help you communicate your message more clearly.
Take the first step towards creating stunning presentations today!
Build Stunning Slides in Seconds with AI
- No design skills required
- 3 presentations/month free
- Don't need to learn a new software

Also Read: How to Align Text Boxes in PPT
Frequently Asked Questions About Adding Columns in PowerPoint
Can I format each column individually?
Columns built with the “Columns” tool use the same formatting. If you want to format each column differently, you must create separate text boxes for each column and format them as needed.
Is my column formatting preserved if I convert the PowerPoint presentation to a different format (e.g., PDF)?
Yes, column formatting is often retained when converting PowerPoint presentations to PDFs or other standard formats, ensuring that the layout is consistent across file types. This is critical for ensuring that your presentations remain professional when shared with others.
How many columns can you create in PowerPoint?
Yes, column formatting is often retained when converting PowerPoint PowerPoint allows up to three columns using the built-in feature. For more columns, you can use tables or multiple text boxes.
Can I adjust the spacing between columns in PowerPoint?
Yes, by selecting “More Columns,” you can modify the spacing (gutter) between columns to improve readability and layout.
How do I remove columns in PowerPoint?
To remove columns, select the text box, go to the Columns option, and switch back to a single column layout.
What is the best way to create multiple columns in PowerPoint?
Yes, column formatting is often retained when converting PowerPoint prThe best method depends on your needs. Use the Columns feature for simple layouts, tables for structured content, and multiple text boxes for full design flexibility.
Why are my columns not showing properly in PowerPoint?
This usually happens due to limited text box width, improper spacing, or too much content. Adjust the text box size or column settings to fix the layout.