You’ve built a great Google Slides presentation — now you need it to run on its own. Maybe it’s for a trade show booth, a lobby display, a classroom screen, or a seminar check-in area. Whatever the case, you need the slides to keep playing without anyone clicking through them manually.
The good news: Google Slides makes this easier than you might think. In just a few steps, you can set your presentation to auto-advance and loop continuously, so your message keeps reaching people long after you’ve stepped away. This guide walks you through two straightforward methods to make it happen, plus the common pitfalls to avoid so your slideshow runs without a hitch.
Why Would You Require Google Slides to Play Automatically?
Looping Google Slides can be a useful tool in many situations. Here are a few examples:
- Showcases and Events: Businesses often use looping presentations at trade shows or exhibitions to attract attention and share information.
- Educational Settings: Museums, schools, and visitor centers can use looping slides to continuously display educational content.
- Event Announcements: Conferences and seminars can use looping presentations to keep attendees informed about schedules and other details.
- Training and Onboarding: Companies can use looping presentations to reinforce key points during training sessions.
By automatically looping their slides, businesses and organizations can ensure that their message is consistently delivered to their audience.
Create Presentations Easily in Google Slides and PowerPoint
14M+Installs

How to Makе Googlе Slidеs Play Automatically?
Two different methods can be used to make Google Slides play automatically in a loop. Let’s take a detailed look at them below:
1. Using the “Slidеshow/Presenter” option to play Google Slides automatically
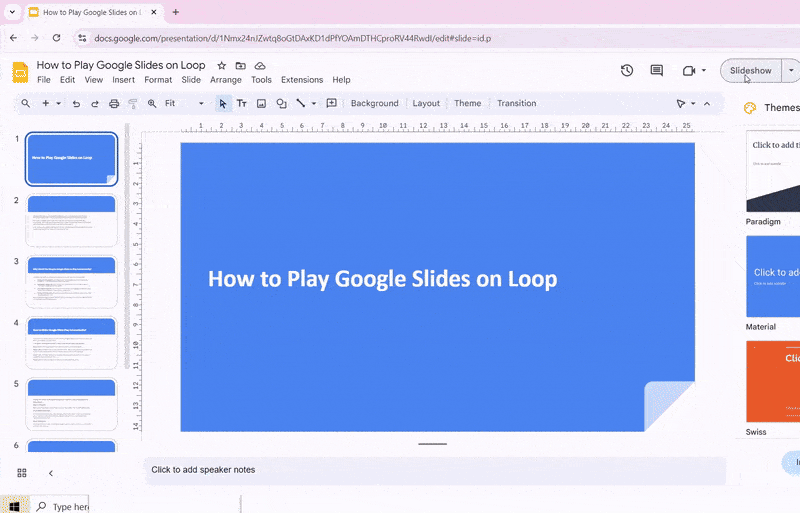
Step 1: Open the Google Slides presentation you want to loop automatically.
Step 2: Click on “Slideshow” to enter slideshow mode. Move your cursor to the bottom-left corner of the presentation and click on the three-dot menu icon that appears.
Step 3: Select “Autoplay.” Choose how long each slide should stay on the screen before automatically advancing to the next.
Step 4: Click the “Play” button to start the automatic looping playback.
Build Stunning Slides in Seconds with AI
- No design skills required
- 3 presentations/month free
- Don't need to learn a new software

2. Using “the Publish to Wеb/Published Version” Option to make Google Slides Play Automatically
Step 1: Get Started
Open your Google Slides presentation and go to File > Share. Then, click Publish to web.
Step 2: Make it Automatic
In the Publish to web window, go to the Link tab. Check the box next to Start slideshow as soon as the player loads. This will make your presentation start automatically when someone clicks on the link.
Step 3: Set the Pace
Under Auto-advance slides, choose how long you want each slide to stay on screen before moving to the next one.
Step 4: Publish It
Once you’re happy with the settings, click Publish. You’ll see a notification. Click OK to confirm.
Step 5: Share the Link
After publishing, you’ll get a special link for your presentation. Copy and share this link with anyone you want to see your slideshow.
Present Mode vs Publish to Web – The Difference
| Feature | Present Mode | Publish to Web |
|---|---|---|
| Best Use Case | Live meetings, classrooms, or manual presentations | Kiosks, digital displays, websites, and auto-playing slideshows |
| Control During Playback | Full manual control with next/previous slides and presenter navigation | Can auto-advance slides automatically with set timing |
| Audience Access | Shared viewers usually open the file in the Google Slides viewer | Anyone with the published link can view it in a simplified web version |
| Editing & Updates | Changes appear in the original file instantly | Can auto-update the published version or be manually republished depending on settings |
| Best for Looping Slides | Less ideal for unattended looping screens | Best option for continuous looping displays and signage |
Common Mistakes to Avoid When Setting Up Google Slides Looping
- Using Very Short Auto-Advance Timing: Setting the slide duration too low (such as 1–2 seconds) makes the content difficult to read.
Best practice: Use around 5–10 seconds for text slides and slightly longer for slides with charts or detailed information. - Not Applying Transitions to All Slides: Auto-advance only works on slides where the transition is applied. Many users forget to enable it for the entire presentation.
Fix: In the transition panel, select apply to all slides. - Forgetting to Enable Looping: If looping is not enabled, the slideshow stops when it reaches the final slide. This is a common issue for kiosks, displays, or unattended presentations.
Fix: Turn on Loop in slideshow settings or enable restart slideshow after the last slide when using the publish to web option. - Using Click-Triggered Animations: Animations set to on click interrupt automatic playback because they require manual interaction.
Fix: Change animations to after the previous so they play automatically with the slide. - Skipping a Full Slideshow Test: Transitions and timing may behave differently in edit mode compared to presentation mode.
Best practice: Run the slideshow from start to finish to confirm timing, animations, and looping work correctly. - Overlooking Internet Requirements for Published Slides: Presentations published online rely on an internet connection for playback. Weak connectivity can interrupt auto-advance or looping.
Fix: Use a stable internet connection for events, digital displays, or continuous playback setups.
Closing Thoughts
With these easy methods, you can make your Google Slides presentations play automatically, adding a smooth and professional touch. Whether for business, education, or events, looping your slides ensures your message is seen without any extra effort.
Create professional presentations faster with an AI presentation generator.
Frequently Asked Questions Related to Playing Google Slides on Loop
1. How do I stop the loop?
To stop the loop, close the browser tab displaying the presentation. If you’re in presentation mode, simply exit the mode by pressing Esc.
2. Can I loop only a section of my Google Slides?
Currently, Google Slides does not offer a native way to loop only a portion of your presentation. You would need to duplicate the desired slides within the presentation or use advanced scripting options.
3. Are there any limitations to looping Google Slides?
Looping through the Publish to the web option has limitations, such as the need for an internet connection and less control over interactive features. For full control and offline use, consider alternative presentation software.
4. Can I loop a presentation offline?
Google Slides requires an internet connection for most features. However, if you need an offline solution, consider downloading your presentation as a PowerPoint file and using PowerPoint’s looping features.