
For all PowerPoint presentation enthusiasts, timelines are considered to be a blessing as they are one of the most popular design tools. These are used to present processes in a visually interesting manner. If your company has multiple processes, product cycles, or historical data to present, a PowerPoint timeline template is an excellent way to showcase them.
But how to make a timeline in PowerPoint? What different methods can you apply to customize the process? Keep reading to find out.
Types of Timeline Layouts for Presentations
Every timeline template in PowerPoint contains its own design and purpose. Below are the most common types of timeline layouts for presentation:

- Linear Timeline: A linear timeline shows events along a straight line, typically highlighting only start and end dates to give a high-level overview.
- Vertical Timeline: A vertical timeline displays events from top to bottom, making it ideal for presenting detailed or complex information in a limited space.
- Chronological Timeline: A chronological timeline presents events in the order they occurred, commonly used for history, product development, or milestones.
- Gantt-Style Timeline: A Gantt-style timeline visualizes project tasks, timelines, and dependencies, helping teams track progress and deadlines clearly.
- Roadmap Timeline: A roadmap timeline outlines long-term plans and key milestones for a product or business, showing progress over time at a strategic level.
How to Create a Timeline in PowerPoint: Step-by-Step Guide
Here are the 4 methods to create a timeline in PPT. Step-by-Step PowerPoint Timeline Tutorial
Method 1: Using SlidesAI Template
Step 1: Download the Template
- Visit SlidesAI and explore their collection of templates.
- Select the Timeline Presentation Template
- Download the Template to your computer.
Step 2: Open Your Existing PowerPoint Presentation
- Launch PowerPoint and open the presentation where you want to apply the SlidesAI template.
Step 3: Apply the Template
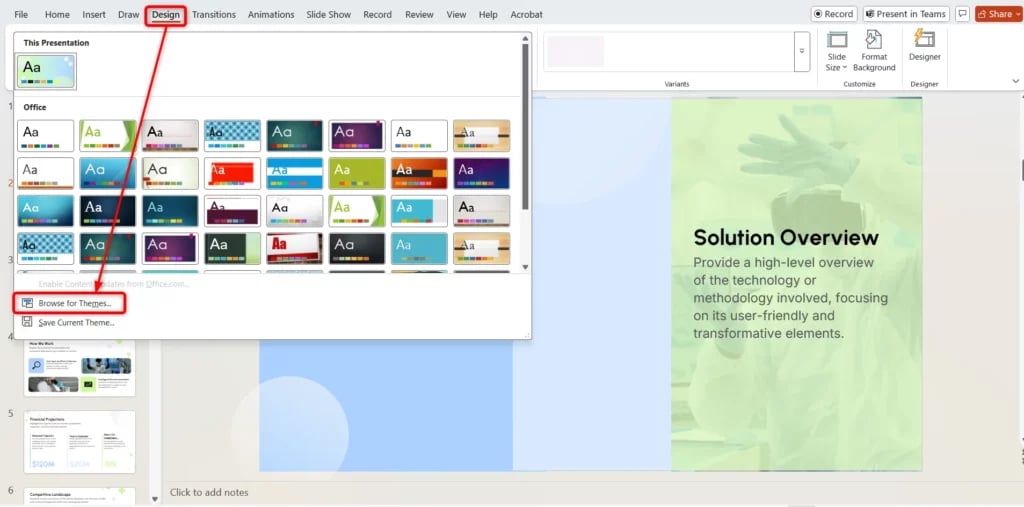
- Head over to the Design tab in the PowerPoint ribbon.
- Click on the More button (downward arrow in the Themes section).
- Select Browse for Themes from the dropdown menu.
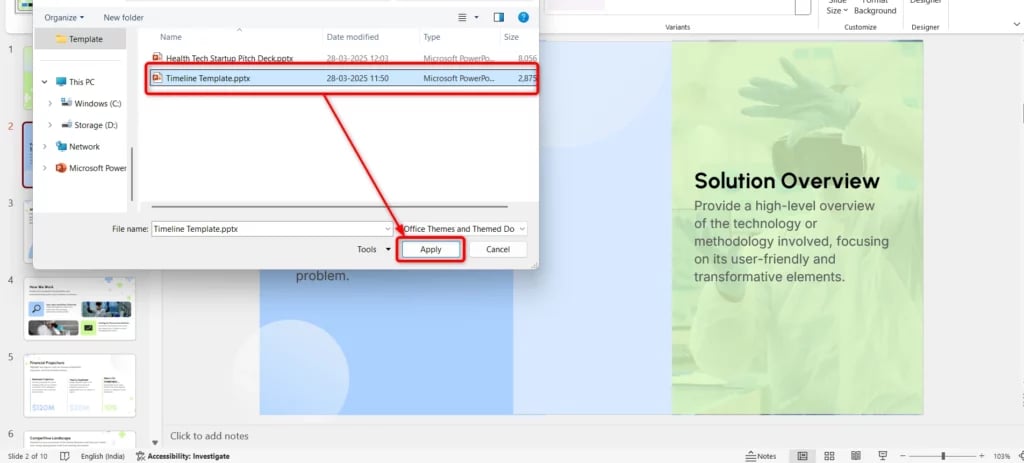
- Locate the downloaded SlidesAI template file (typically in .pptx or .potx format).
- Click Apply to integrate the template into your presentation.
Step 4: Customize Your Slides
- Once the template is applied, review each slide to ensure proper formatting.
- Adjust text, images, and graphics as needed to align with the template’s design and maintain a professional look.
Build Stunning Slides in Seconds with AI
- No design skills required
- 3 presentations/month free
- Don't need to learn a new software

Method 2: Using PowerPoint Timeline Templates
Step 1: Open PowerPoint
Launch Microsoft PowerPoint on your computer.
Step 2: Choose a Template
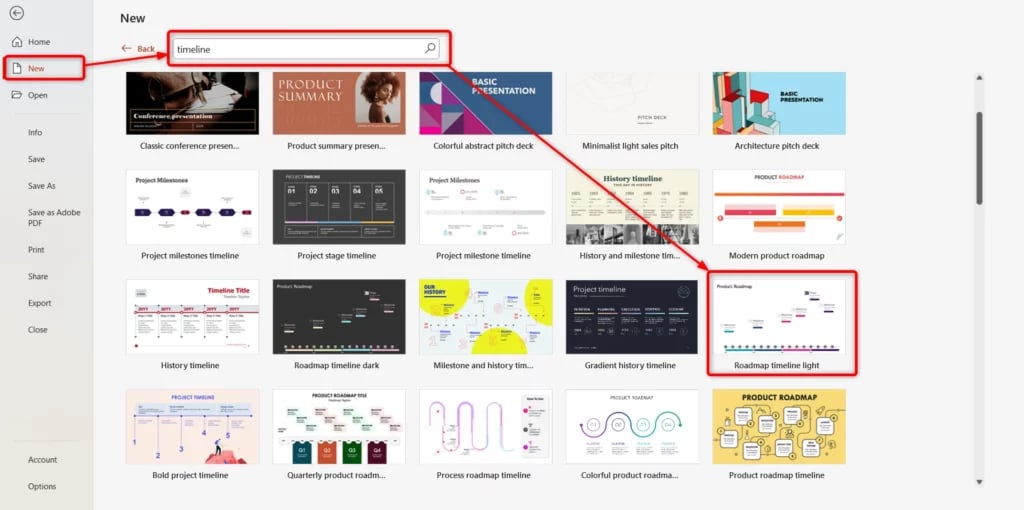
- Click on File > New.
- Go to the search bar and look for “Timeline” templates.
- Then, choose the template that fits your needs and click Create to open it.
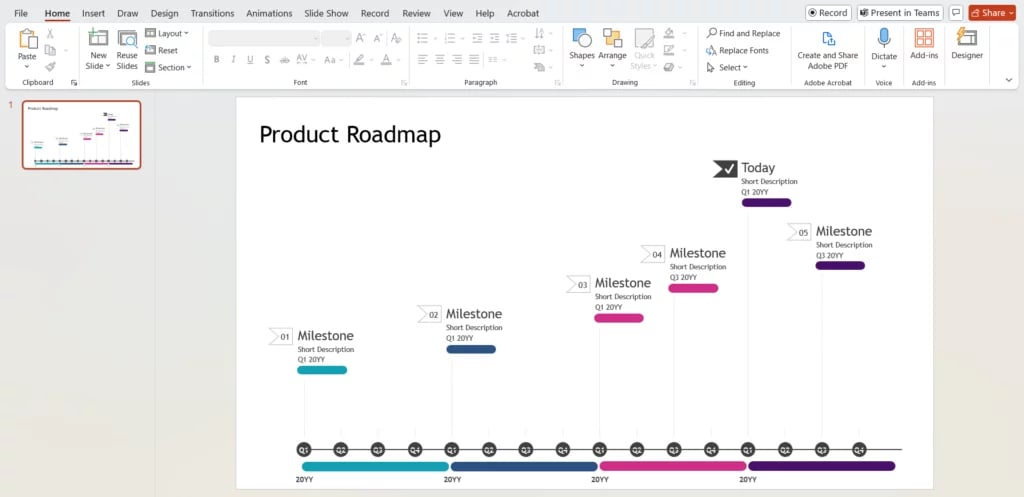
Step 3: Customize the Timeline
- Click on each text box to edit milestones, dates, and descriptions.
- Adjust colors, fonts, and styles using the Design and Format tabs.
Step 4: Add or Remove Events
- To add a new event, copy an existing milestone shape and paste it in the correct position.
- To remove an event, click on the shape and press Delete.
Step 5: Enhance with Icons and Images
- Go to Insert > Icons or Insert > Pictures to include relevant visuals.
- Resize and position images/icons to fit your design.
Step 6: Animate the Timeline (Optional
- Select a timeline element and navigate to the Animations tab.
- Apply effects like Appear or Fade for a dynamic presentation.
- Use Slide Show Mode to preview the animations.
Step 7: Save and Present
- Click File > Save As to store your presentation.
- Press F5 to enter Slide Show Mode and present your timeline seamlessly.
Create Presentations Easily in Google Slides and PowerPoint
- No design skills required
- 3 presentations/month free
- Don't need to learn a new software

Method 3: Using Shapes
Step 1: Open a Blank Slide
Use a blank slide so you can freely place and adjust all timeline elements.
Step 2: Insert the Main Timeline Line
Go to Insert → Shapes and draw a horizontal line or rectangle to act as the timeline base.
Step 3: Add Milestone Shapes
Insert circles, rectangles, or rounded rectangles along the line to represent each milestone.
Step 4: Add Timeline Data (Dates & Events)
Click inside each shape or add a text box to enter dates, phase names, and short descriptions for every milestone.
Step 5: Duplicate and Align Shapes
Copy milestone shapes for consistency. Use Align → Distribute Horizontally to keep spacing even.
Step 6: Connect Shapes (Optional)
Use connector lines to visually link milestones to the main timeline.
Step 7: Format the Timeline
Adjust colors, fonts, shape size, and outlines to match your presentation theme and improve readability.
Step 8: Group the Timeline Elements
Select all shapes, right-click, and choose Group so the timeline stays intact when moved or resized.

Method 4: Using SmartArt
Step 1: Set Up Your Presentation
- Open Microsoft PowerPoint and create a new presentation or open an existing one.
- Add a new slide where you want to insert the timeline.
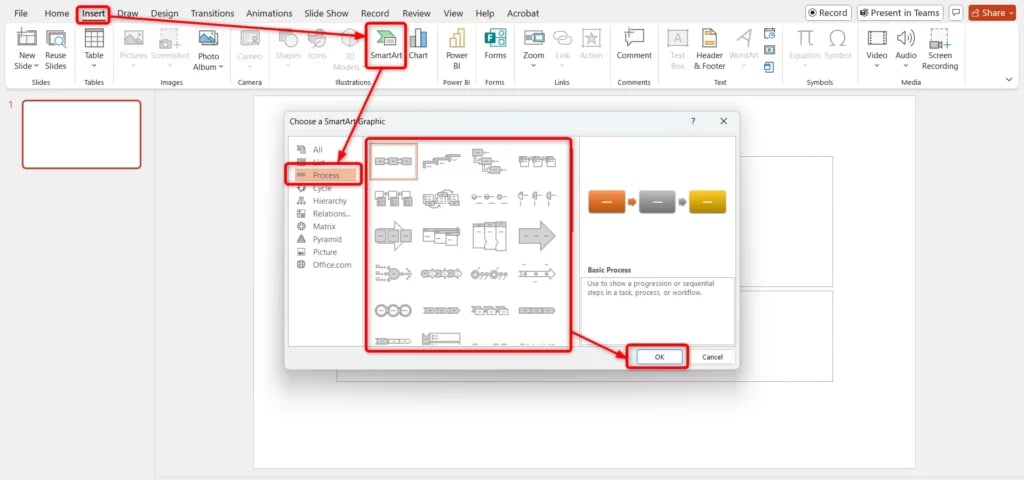
Step 2: Insert a SmartArt Timeline –
- Go to the Insert tab in the menu bar.
- Click on SmartArt to open the SmartArt Graphics selection.
- Navigate to the Process category and select Simple Timeline.
- Explore different styles and templates to find the best fit for your presentation.
Step 3: Add Your Data
- Click inside the milestone’s [Text] box or use the text pane for easy data entry.
- Press Shift + Enter to insert a line break within a milestone.
- To add more milestones, press Enter in the text pane, and PowerPoint will automatically generate a new milestone.
- The font size will adjust dynamically based on the number of events and the text length.

Step 4: Customize Your Timeline
- Modify font properties to enhance readability.
- Change milestone colors to differentiate key events.
- Adjust the timeline axis by altering its color and width.
- Reposition milestones for better visual balance.
Create Presentations Easily in Google Slides and PowerPoint
14M+Installs
Best Practices to Create a Timeline in PowerPoint
- Start with a Clear Purpose: Decide whether your timeline is for a project plan, history, roadmap, or process. The goal determines the layout and level of detail.
- Choose the Right Timeline Type: Use linear timelines for overviews, vertical timelines for detailed content, Gantt-style timelines for projects, and roadmaps for strategy.
- Keep It Simple and Scannable: Avoid overcrowding. Focus on key dates and milestones instead of adding too much text.
- Use Consistent Spacing and Alignment: Even spacing between milestones improves readability. Use PowerPoint’s Align and Distribute tools for precision.
- Limit Fonts and Colors: Stick to 1–2 fonts and a consistent color palette to maintain a clean, professional look.
- Write Short, Clear Labels: Use brief titles or dates. If more explanation is needed, place it below or in speaker notes.
- Maintain a Logical Flow: Ensure the timeline clearly moves left to right or top to bottom so viewers can follow it naturally.
- Test Readability on Different Screens: Check font size and spacing to ensure your timeline is easy to read during presentations or when shared digitally.
- Use Animations Sparingly: Apply subtle animations only when needed to reveal steps or phases without distracting the audience.
Why Do You Need to Add a Timeline in Your PowerPoint?
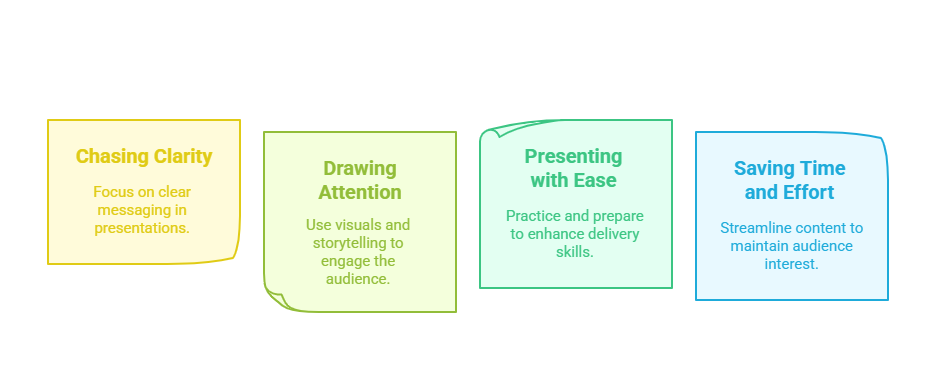
- Chasing Clarity: A timeline gives your audience a clear sequence of events, making complex information easier to understand.
- Drawing Attention: Timelines reduce visual clutter and guide the audience’s focus to the most important information.
- Presenting with Ease: A structured timeline helps you present smoothly while keeping your content organized and coherent.
- Saving Time and Effort: PowerPoint timelines are easy to create and update, helping you showcase key events quickly and efficiently.
Create Presentations Easily in Google Slides and PowerPoint
14M+Installs
Frequently Asked Questions About Making a Timeline in PowerPoint
How to create a timeline in Slides?
To create a timeline in Google Slides, navigate to Insert > Diagram, select the Timeline option, and pick a preferred style. Customize it by modifying the text, dates, and colors to suit your needs. For a more visually appealing presentation, consider adding relevant images or icons.
Read more: How to Make a Timeline on Google Slides? 4 Easy Steps
How do I create a timeline in PowerPoint with no templates?
You can manually design a timeline by inserting shapes (such as rectangles, circles, or lines) and adding text boxes to highlight key milestones. Alternatively, using SmartArt provides a faster way to create a structured timeline without relying on pre-made templates.
Can I customize the timeline design in PowerPoint?
Yes, you can modify colors, fonts, shapes, and layouts through the Design and Format tabs. Additionally, you can enhance visual appeal by incorporating animations for a more dynamic presentation.
How do I add more milestones or events to my timeline?
You can copy and paste existing shapes or SmartArt elements and reposition them along the timeline as needed. If you are using SmartArt, simply go to the SmartArt Tools tab and select Add Shape to include additional milestones.
Can I animate my timeline in PowerPoint?
Yes! Navigate to the Animations tab to apply effects such as Appear, Fade, or Motion Paths to individual milestones, creating a more dynamic and visually engaging timeline.