PowerPoint is a reliable tool for digital presentations. PowerPoint presentations are utilized extensively in a variety of venues, including classrooms, boardrooms, and conferences. They act as visual aids to improve verbal communication, making difficult material more digestible.
However, as you progress in a fast-paced digital age, the manner in which you convey information must change. You can dramatically improve your PowerPoint presentations so that they reach a larger audience by transforming your PowerPoint slides into videos.
Not only does this approach maximize the impact of your presentations, but it also provides a more flexible and engaging way to share your content.
But how to make a video from a PowerPoint presentation? Keep reading to find out the answers!
How Do You Convert a PowerPoint Presentation to a Video?
Method 1: Exporting Slides Directly to Video
Now that you understand the benefits of converting your PowerPoint presentation to video let’s go over how to do it on Windows.
Step 1: Open Your Presentation
Begin by opening the PowerPoint presentation you want to convert. Navigate to the “File” tab, which is found in the window’s top left corner.

Step 2: Export Options
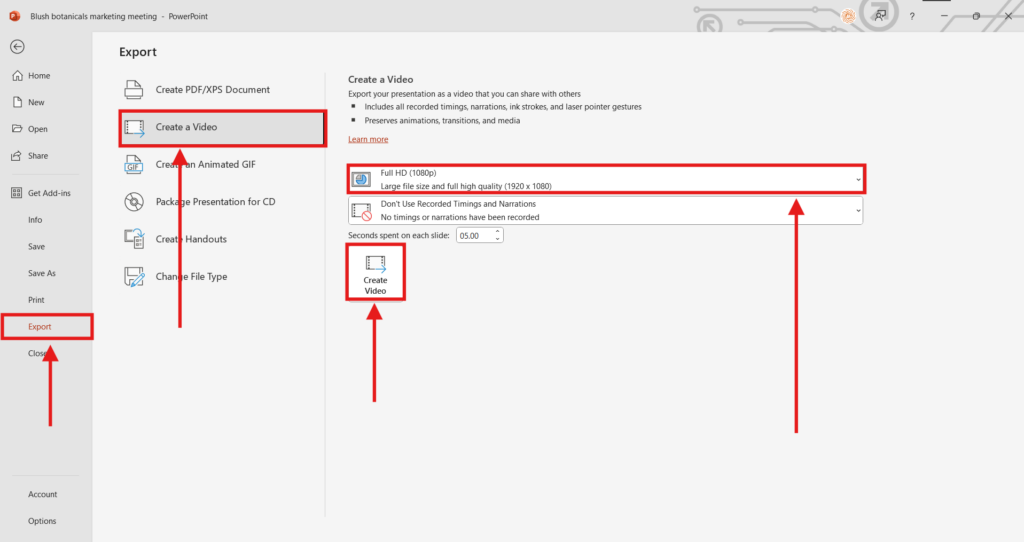
Next, under the menu’s left pane, select “Export”. From the list of options, choose “Create a Video.”
Step 3: Select Video Quality
You now need to choose the video quality, as well as the recording timing and narration. PowerPoint has four options for video quality.
- Ultra HD (4K): The greatest file size possible in ultra-high quality.
- Complete HD (1080p): A huge file size that provides complete high quality.
- HD (720p): A medium-sized file with mediocre quality.
- Standard (480p): The smallest file size and lowest quality.
Choose the option that best meets your needs.
Step 4: Add Timing and Narrations
Once you’ve chosen the quality, you can add recorded timings and narrations. Decide whether you wish to include these features in your video.
Step 5: Adjust the Slide Duration
Set the duration of each slide’s display during the video. The default time is 5 seconds, but you may change it by clicking the up or down arrows in 1-second increments.
Step 6: Create Your Video
When you are finished with your options, click “Create Video.” Your PowerPoint immediately starts the converting process.
Read Related – How Add Animation in PowerPoint
Method 2: Recording Narration and Webcam
This method lets you record yourself presenting, with your voice and optionally your face captured alongside the slides. The result is a narrated video where viewers hear you speak and see you on camera, the same way you’d deliver the presentation live.
Step 1: Open the Record tab
Open your presentation in PowerPoint and click the Record tab in the ribbon at the top.
Step 2. Choose where to start
Select From Beginning to record the full presentation, or From Current Slide to start from a specific point.
Step 3. Check your camera and microphone
In the top-right corner of the recording window, confirm PowerPoint is picking up the right camera and microphone. You’ll see a live preview and an audio meter.
Step 4. Click Record
Hit the large red Record button. A 3-second countdown will appear before recording begins.
Step 5. Present your slides
Speak naturally and advance your slides using the arrow keys, just as you would in a live presentation.
Step 6. Stop the recording
Click Stop when you’ve finished presenting.
Step 7. Re-record a single slide if needed
If you made a mistake on one slide, navigate to it and click Record again. Only that slide’s recording is replaced — the rest stays intact.
Stpe 8. Export the video
Go to File > Export > Create a Video, select Use Recorded Timings and Narrations, choose MP4 as the format, and click Create Video.
Method 3: Recording Your Screen
Screen recording captures your presentation as you run it in Slide Show mode, along with your microphone audio and optionally your webcam. Unlike Method 2, this works with any screen recording software and gives you more control over the final output, especially useful if you want to edit the video afterward or use a tool with additional features.
Step 1 Open Screen Recording
Go to Insert > Screen Recording in the PowerPoint ribbon.
step 2: Select your recording area
Click Select Area and drag to cover your entire screen so the slideshow fills the recording frame.
Step 3: Turn on audio
Make sure the Audio toggle is enabled in the toolbar so your microphone is captured.
Step 4: Start your slideshow
Press F5 to launch your presentation in full-screen Slide Show mode.
Step 5: Click Record
Hit the Record button in the toolbar to begin capturing your screen.
Step 6: Present your slides
Go through your presentation normally, advancing slides with the arrow keys or mouse clicks.
Step 7: Stop the recording
Move your mouse to the top of the screen to reveal the toolbar, then click Stop.
Step 8: Save the video
The recording appears as an embedded video on your slide. Right-click it and select Save Media As to export it as an MP4 file.
Best Practices to Convert a PPT to Video
1. Set your slide size to 16:9 before you start
Go to Design > Slide Size > Widescreen (16:9) before exporting. This ensures your video fills the screen without black bars on the sides.
2. Keep animations short and consistent
Set all transitions to around 0.25 to 0.5 seconds. Long or flashy effects that worked in a live presentation can make a video feel slow.
3. Use high contrast between text and background
Video compression can blur fine details. Dark text on a light background, or light text on a dark background, holds up much better after compression.
4. Run through the slideshow before exporting
Press F5 to preview your full presentation before converting. This is the easiest way to catch broken animations or missing media before they end up in the final video.
5. Export at Full HD (1080p) or higher
Always export at 1080p unless file size is a hard constraint. Videos exported at lower quality often look blurry, especially on larger screens or when uploaded to YouTube or LinkedIn.
6. Choose the right format for where you’re sharing
Export as .mp4 for YouTube, LinkedIn, or email. Use .wmv only if you’re sharing in a Windows-only environment.
Conclusion
In today’s digital landscape, the ability to effectively express your ideas is critical, whether you are a student, instructor, business professional, designer, or small business owner. Making a video from a PowerPoint presentation is a creative technique to improve your content and a practical strategy for effective communication.
By following the procedures mentioned in this blog, you can simply convert a traditional presentation into a dynamic video format that is convincing, visually appealing, and accessible.
If you found this information useful, consider learning more about multimedia presentations and how to optimize them for different platforms. There is always more to learn, and every presentation provides an opportunity to improve your talents!
Build Stunning Slides in Seconds with AI
- No design skills required
- 3 presentations/month free
- Don't need to learn a new software

Read Related – How to Embed a Video in PowerPoint
Frequently Asked Question About Making a Video From a PowerPoint
Which video formats can I save my PowerPoint presentation in on Windows?
On Windows, you can save your PowerPoint presentation in either MP4 or WMV format. Various devices and platforms generally support MP4, but WMV is a Windows-specific format.
Why can’t I convert PowerPoint into video?
If you are experiencing problems converting your PowerPoint, look into the background applications operating on your PC. Too many programs can impede the conversation process. Additionally, software such as virus blockers may hinder the procedure.
Do the embedded films and animations play in the exported video?
Yes, any embedded movies and animations in the presentation play as they would in a standard slideshow.
How long does it take to make a video from a PowerPoint presentation?
The process takes between 5-20 minutes. The export time is determined by the amount of slides, the intricacy of the animations, and the video’s resolution.
Can I add subtitles in many languages to my video?
PowerPoint does not allow multi-language subtitles directly. You can make separate text boxes for each language on your slides or add subtitles in video editing tools after exporting. Alternatively, use Video Subtitle Generators to create subtitles in different languages quickly and efficiently.